Digital Photography Tips: Essential skills to quickly transform your Photos. Find useful tips and advice for beginners and amateur photographers. Learn lighting basics & best camera settings.
Introduction
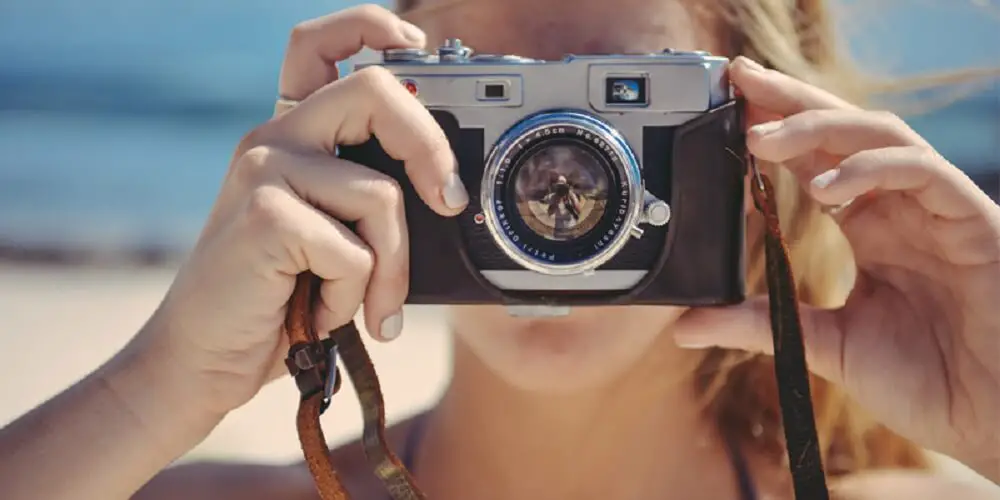
Have you recently got yourself a digital camera?
Armed with a good camera and little bit of skills, you can take great pictures, something that was once the realm of only professionals until a few years back.
Understanding Camera Settings & Important Concepts
Most pros are able to shoot great pictures because they are able to focus the attention on the subject and at the same time have complete control of the background. They also pay a lot of attention to correct exposure and focus.
Difference situations will require different shutter speed and aperture. For instance, if you want to shoot drops of water hitting the water surface, then it will require faster shutter speed compared to shooting a model indoors, which requires slow shutter speed.
Exposure
 In digital photography, exposure refers to the amount of light that falls on your cameras image sensor, when you take a photograph.
Exposure value refers to the different combinations of your camera’s shutter speed and relative aperture (that gives the same exposure).
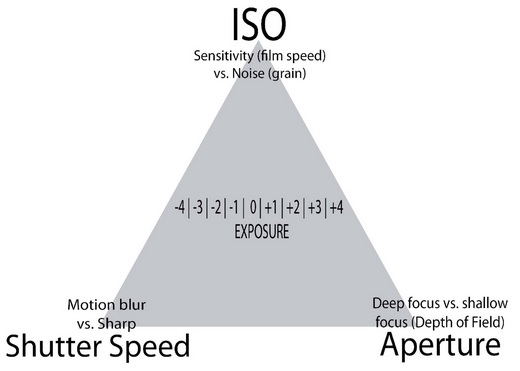
The Exposure Triangle
Here are the three key elements that affect your exposure, and work together to create a perfectly exposed image:
- ISO Sensitivity
- Shutter Speed, and
- Aperture (f-stop).
In photography, this is known as the exposure triangle.
Underexposure vs Overexposure
Having the incorrect exposure could result in the photos being either:
- Under-exposed or
- Over-exposed
Note: You can enhance a good photo further using a photo editing program such as Photoshop, but if your original image is not exposed correctly (either underexposed or overexposed), you cannot do much to the picture using any photo editing program.

ISO Settings
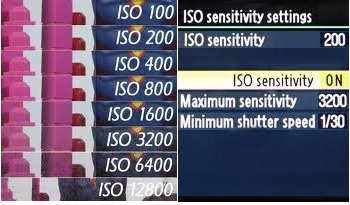
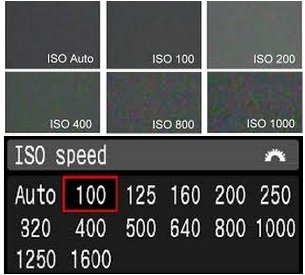
The ISO settings on your camera determines how sensitive is your cameras sensor to light, and the grain or noise in your photos. The lower the ISO number, the less sensitive it is to the light, while a higher ISO number increases the sensitivity of your camera.
Its a standard for measuring light sensitivity nowadays.
ISO stands for International Standards Organization.
The normal range for most cameras is from ISO 100 to about 1600. Some digital camera however can go as low as 25 or as large as 6400.
Here’s what you need to know about your Camera’s Image Sensors Sensitivity:
- Lower ISO number means the camera’s image sensor is less sensitive to light, higher number means its more sensitive to light.
- At lower ISOs, the image looks darker but smoother (less noise/grain). At higher ISOs, the images are brighter and more grainy (more light is used to expose your image).
- High sensitivity settings are generally used when the available light is less and where you are unable to use flash photography (at night or in dark theaters)
- Low sensitivity settings are generally used for outdoor photography (on well lit days) and in studios where you can using lights or use flash photography.
Note: ISO along with shutter speed and aperture, all work together to create the perfect exposure. So, if you change your ISO Settings and you still want to keep your exposure consistent, you’ll need to adjust either your shutter speed, your aperture, or both.
Shutter Speed
Shutter is a shutting mechanism similar to a window shade, and is placed either behind the camera lens or is built into the middle of the lens, next to the aperture.
When you take a picture, the shutter opens briefly and allows you to control the amount of time for which the light passing through the lens remains in contact with the digital image sensor.
It is activated by the camera’s release button.
In photography, shutter speed is the length of time for which the digital sensor inside the camera is exposed to light, when a camera’s shutter is open when taking a photograph. Experienced photographers often use shutter speeds to convey or freeze motion.
Shutter speed determines the exposure time or duration of the light reaching the film or image sensor, whereas Aperture determines the amount of light passing in.
The usual range of speeds is: 1, 1/2, 1/4, 1/8, 1/15, 1/30, 1/60, 1/125, 1/250, 1/500, 1/1000, 1/2000, 1/4000 sec.
One thing to note is that, as the number of the denominator becomes larger, the shutter speed actually increases. And as a result less light is allowed to pass through, which leads to decreased exposure.
Aperture & F-Stop
 Understanding camera aperture is crucial as it controls the amount of light reaching the digital image sensor and has a great impact on the quality of the image.
When taking pictures, there are some settings on the camera that control how your end result is going to be.
And one of them is the Aperture!
I’m sure you would have realized by now that strong or weak lighting conditions can make your photos look far from perfect.
And that is why you need to set the aperture to let the right amount of light pass in.
The aperture is basically an adjustable hole created by a diaphragm in the lens, which allows light to pass in and form the image.
It works more or less similar to the iris of the eye, and can be adjusted in size. You can use it to make the image brighter or dimmer.
And how do you use it?
- When it is too bright, reduce the aperture so that less light comes in through the lens
- If the light is poor, enlarging it to let more light pass in through the lens
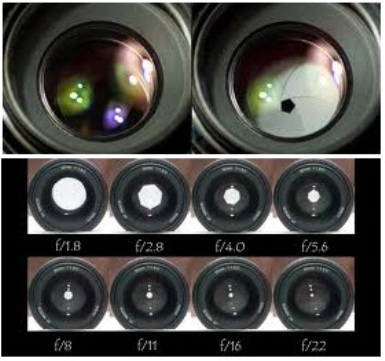
- Aperture is measured in f-stops
- You need to adjustment the diaphragm by setting the f-stop
- Each stop represents a factor of two in the amount of light admitted
Aperture & F-Stop Correlation
A larger aperture means a smaller f-stop setting.
So, the larger the value of the f-stop, it means the smaller the opening of the aperture!
It is so because an f-stop is the ratio of the focal length of the lens to the diameter of its opening. Note that the diameter is in the denominator and that answers your question!
F-Stop Readings
The lenses are calibrated with the following apertures: 1.4, 2.0, 2.8, 4.0, 5.6, 8.0, 11, 16, 22, 32, 45, 64.
Each step represents a halving of the amount of light that comes through the lens.
Aperture along with the shutter speed setting directly affects the total exposure of an image, and also how much of the image is in focus.
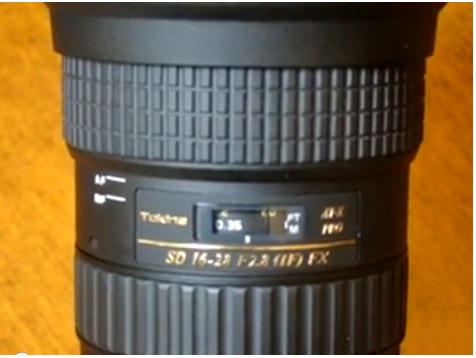
A concept to understand here is that of Fast Lens.
It basically means the speed of the lens and is determined by the maximum amount of light the lens is capable of passing through, which is indicated by the smallest f-stop value.
When a lens is capable of passing through more light than other lenses of the same focal length, then the lens is viewed as fast (make fast italic).
So fast lenses usually means having a maximum f-stop value of 1.0 to 2.8!
Cool Tip
The larger the aperture, the faster is the lens. The reason being a lens with maximum aperture lets more light in and therefore you can use faster shutter speeds, even when there might not be much light around.
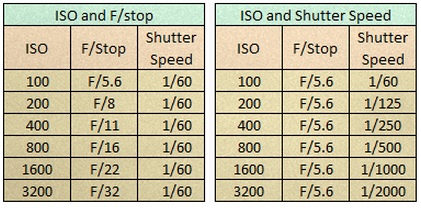
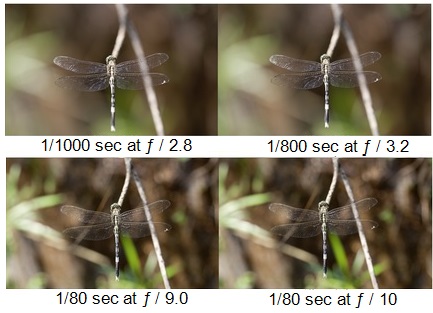
What is Reciprocity?
Reciprocity is nothing but the relationship between aperture and shutter speed.
You need to remember that the doubling or halving of the speed settings compliments the aperture f-stop settings, in terms of the exposure given to the image.
It means that the following combination of shutter speed & Aperture settings will give the same exposure of the image:
- 1/30 of a second at f/11
- 1/60 of a second at f/8
- 1/125 of a second at f/5.6
All the above would give the same exposure.
I hope you realize the importance of aperture and shutter speeds in shooting pictures.
It allows you to control the exposure over a wide range of lighting conditions, as well as to control the depth of field of the image.
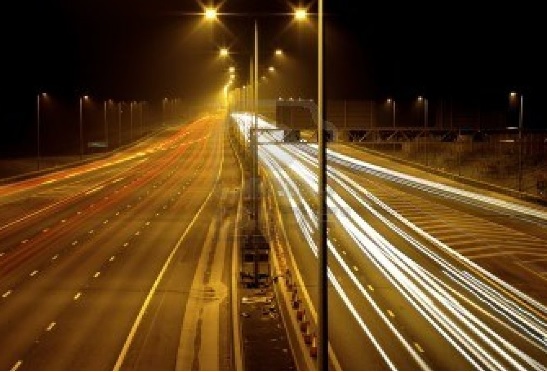
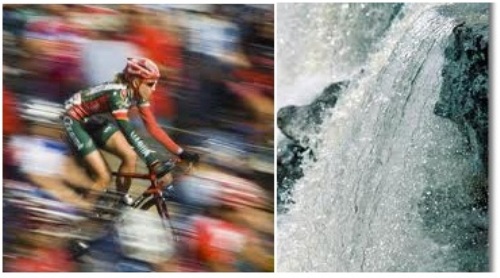
Most photographers use the speed setting of the shutter to record motion, either as frozen or blurred, to give a sense of action.
In general:
- Shutter speed can have a dramatic impact on the appearance of moving objects
- Images taken with a lower shutter speed invoke a visual sense of movement
- Slow shutter speed combined with panning the camera can achieve a motion blur for moving objects
Cool Tip
- Slow shutter speed gives blurred motion
- High shutter speed gives frozen motion
Depth of Field (DOF)

Depth of Field: Here’s an important concept in Photography, and how understanding it can help you take better pictures.
Depth of Field (DOF) is the distance between the nearest and farthest objects in a scene that appear acceptably sharp in an image.
Basically, it means how much of the subject will be in sharp focus.
As a general rule, most photographers use a wide depth for landscape photography that makes the photo appear sharp and clear, whereas for portrait photography they usually focus on the eyes with a shallow depth.
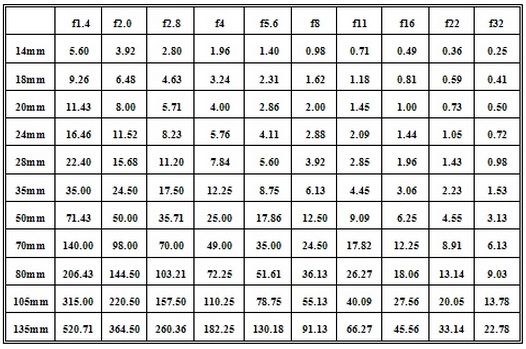
Here are the things that determine the depth of field:
- Aperture Value: The DOF is directly dependent on the f-number. The smaller the f-number, the smaller will be your DOF. The larger your f-number, the larger will be the depth of field.
- Focal Length: The focal length is inversely dependent on the DOF. So the longer your focal length, the smaller is your DOF, and the shorter your focal length, the deeper is your DOF.
- Distance of the Subject: If the subject is very close to you, the DOF will be shallower. The further you are away from your subject the deeper the DOF will be.
- Cropping an image and enlarging it to the original size will decrease the original depth of field.
Manual Focus
Auto focusing abilities is a standard on cameras nowadays. However, you can also use manual focus for some forms of photography.
With auto-focusing, when the depth of field is very limited, the camera wastes a lot of time trying to get the right focus. This is because the amount of the image that is in crisp clear focus is very small. That’s why is hard for the auto-focus on the camera to zero in on the exact spot that is most important in the image.
And if at all, the camera does settle on one focal area, most of the time its not the area you are most interested in capturing.
This means, you could lose some important shots (the insect or bird may not wait for long in one specific position)!
That is why experienced photographers chose to use “Manually focusing”, especially for macro photography.
It works best when you are trying to take a close up, especially of an insect or flower.

More Tips to get sharp images by manual focusing:
- Make sure you have turned your lenses auto focus off. Once you have done this, practice adjusting your focus by twisting or turning your focal ring at the front of your lens until what you want to focus on appears sharp in your viewfinder.
- Find something small to focus on but don’t adjust the focal ring. Instead, move your body and the camera closer or further away from the subject until it appears sharp. This keeps it simple and allows you to pay more attention to your subject and less attention to your lens.
- Use the pre-focus technique by zeroing in on the spot I expect my subject to appear and when it does, adjusting how close the camera is to the subject to fine tune the results.
- When using bellows, you can move the bellows closer or further away from the subject to achieve proper focus as well.
- Use a focusing screen or magnifier on your viewfinder to magnify what it is you looking at. This magnifies what you are seeing through the viewfinder, and is great for those who have poor eyesight and find it difficult to see tiny subjects sharply.
- Use live viewing on your camera if you have it. The LCD screen on the back of your camera is larger than your viewfinder and can help you to identify the sharpest part of your image more clearly than just looking through your viewfinder. However, keep in mind that using this feature drains your battery power much faster.
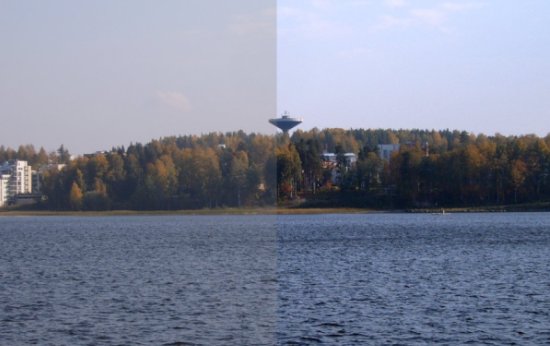
White Balance
White Balance (WB) is the process of removing unrealistic color casts, so that objects which appear white in person are rendered white in your photo.
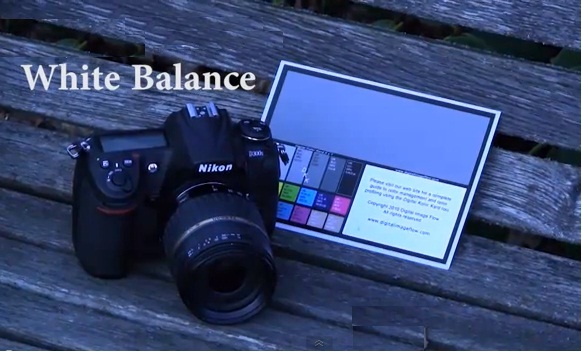 The light sources used for photography contain a mixture of all colors, and can vary considerably from one light source to another.
These light sources can be given a “color temperature” which describes their color value and is measured in units called Kelvin (K). This temperature scale measures the relative intensity of red to blue light.
Few points to remember about the color and temperature:
- Warmer light tends to cast orange-red tint across the image and has a lower temperature
- Neutral or balanced light which is in the middle ranges has little impact on the image’s color values because of its white qualities
- Cooler light such as outdoor daylight is a lot bluer in appearance and has a high temperature
White objects in these different lighting conditions objectively look more blue (in daylight), more red (in incandescent lighting), or more green (in fluorescent lighting).
Our brain is equipped to adjust for different color temperatures so that white almost always looks white, no matter what color light we are seeing it in.
For instance, a white car during a sunset objectively looks quite orange, but if someone asks you what color the car is, you would reply with certainty that the car is white.
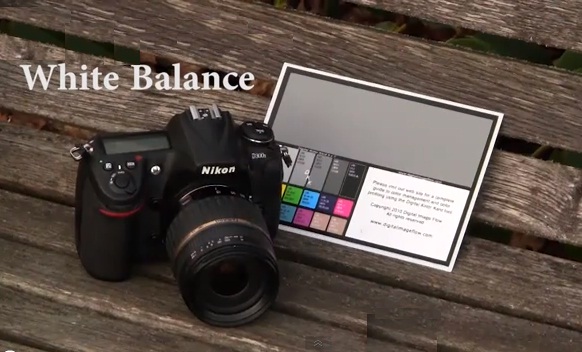
Cameras are equipped with a white balance setting which allows you to specify exactly what the color temperature of the scene is.
In most cases, your camera can automatically adjust to conditions by sampling the color content of the surrounding light.
Some photographers want to capture the colors that they want to see. So you can play around with the white balance to get warmer colors when shooting portraits. After all, photography is also about trying new things and not just capturing as-is pictures.
Rule of Thirds
When it comes to composition, using the rule of thirds is the most popular rule to follow.
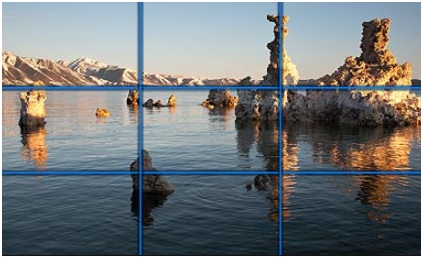 The “rule of thirds” is basically a guideline used to compose aesthetically pleasing images.
Here, you split the scene in 9 equal parts, and the points where the lines intersect is where the points of interest in the photograph should ideally be located.
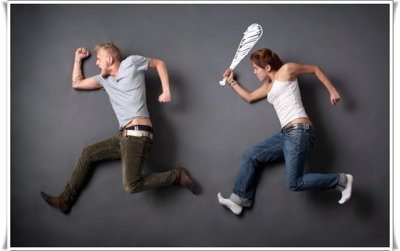
So if you’re shooting a picture of a man/woman running, beginners may shoot with the subject in the center. But the rule of thirds says that you should break the image up into thirds (split into 9 sections: 3 across and 3 down) and pay special attention to the key points of areas.
Because it is human nature to be naturally drawn to these key areas of an image, it seems naturally appealing when images focus on key elements placed on these key focal areas.
The idea is to bring balance to an image by utilizing one or more of these key focal points to highlight the important elements in your photo. For best results, you should use one or more of the key focal areas (instead of focusing only on one).
Here are few more examples of how to use the rule of thirds in photography.
The rule of thirds is definitely a key fundamental in Photography, and the positioning of your subject within these “thirds” does make the images look better.
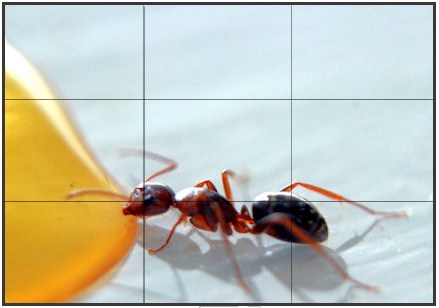
But then, these are guidelines and you can definitely tamper with them, to get better results. In other cases, this rule may not apply at all because the whole image is the focal point. For example, in macro photography, you get the best images when you fill the entire frame with the subject.
However, its best to get the hang of this rule of thirds, before you think about breaking the rule.
Fill the Frame
Filling the Frame is one of the several composition techniques, used in photography, for a better impact.
You may mix it with other rules to get better pictures.
Filling the Frame means to get close to the subject you’re shooting, and cut out the rest – so no distracting background stuff, no noise or distraction.
You just fill the entire image with that of your main subject!
This technique is especially useful in macro photography where you see a flower or an insect occupying the entire frame.
You may use this technique for any type of photography, but in macro photography, usually the subjects are vary small, so this method really helps add punch to the images.
Check out these images and see for yourself how it makes the picture better.
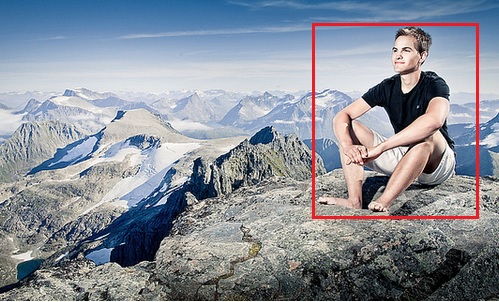

You may fill your frame and blend it with the rule of thirds, leading lines, patterns and symmetry, and more.
Leading Lines in Photography
In photography, a leading line can be any line, man made or found in nature that is utilized to draw the attention towards the subject (sometimes even away from the subject). They are like visual roadways that guide the viewer’s eye through the frame.
This compositional technique can stand on its own to create dramatic images, or you may pair it with other rules (rule of thirds) to take your photography to the next level. It can have some dramatic effects when it leads a viewer into your image or even out of the image.
Lines can be found everywhere, and they come in all shapes, sizes & colors. They and can be straight, diagonal or even curvy.
However, its important that you use this technique to work in favor of your subject and not against it.
Using leading lines, the viewer’s eye is attracted to lines that lead directly to the principle subject in the image.


Bokeh Effect Explained
Bokeh basically means “blurred” (in Japanese).
You get this effect (out of focus blur) on the photo when your lens is set to a shallow depth of field.
You can do it using your camera or using software such as Adobe Photoshop.
Here’s a video that shows how to capture this effect (with a defocused background) using your DSLR camera and a shallow depth of field.
Want even more variety? Why not use a Bokeh Kit?
It’s actually an entirely new way of harnessing night-time light. The Bokeh Kit turns those out of focus light into various shapes, depending on which one you place over your lens.
You get several shapes; just place one of those into the slot in the filter over your digital or film SLR lens, and shoot.
Some Bokeh kits also let you make your own designs. You’ll need to go through the specs to check for compatibility though.
Perspective in Photography
 As a photographer, you can decide how your image/subjects will be perceived by the viewers.
This is similar to how a writer tells a story — it could be from the perspective of the writer, or one of the other characters in the story or from someone completely different.
Also Known As Forced Perspective Photography, it is about creating an optical illusion to make an object appear closer that it actually is.
For example, want to picture a monster biting off your friend’s head? You can do that by using a toy monster and using some creativity. Just place the toy monster close to the camera, and make your friend stand at a considerable distance. Now look into the lens of the camera, focus on the head, and click ― you now have introduced forced perspective, the picture will look like as if your friend’s head is being bitten off by a monster.
Basically, you’re making the viewers believe that some objects are smaller or larger than they really are (creating optical illusions) thus giving an entirely new dimension to your picture.
Its all about creativity and introducing things that will create dimension and depth in the picture. The camera lens, on its own, only views things as flat (lacking in depth).
By merging subjects and backgrounds, introducing things, you can play with the placing of subjects to create depth.

Here are few things to consider:
Play around with the Distance – Pay attention to the distance between the two objects to make it look more natural and to ensure both the subjects are clearly visible, you have to focus on the foreground and ensure the background does not blur.
Go Against Gravity – With this technique, you can definitely defy gravity, and have your subjects flying or crawling in space. Get your subjects to lie on the ground/road and pose, make sure the picture/object drawn or painted on the ground is in alignment, make sure the horizon is lined perfectly. With the right placements, the results can be amazing & look seemingly unbelievable.

Lighting is Important – Lighting is important to ensure the optical illusion looks natural. Make use of tripod stand to avoid shaky shoots.
You Need to Time It Right – Timing is important, if you want to create a perfect illusion.
Here are some of the popular types of perspectives used in photography:
- Linear Perspective
- Rectilinear Perspective
- Vanishing Point Perspective
- Height Perspective
- Overlap Perspective
- Dwindling Size Perspective
- Volume Perspective
- Atmospheric Perspective

Perspective can differ from person to person, so here are some questions that you should ask yourself:
- Do you want the viewer of the image to look into the face of the subject?
- Do you want them to feel that the subject is lying down, or above them or below them?
- Do you want them to see the side-view of the subject, and so on?
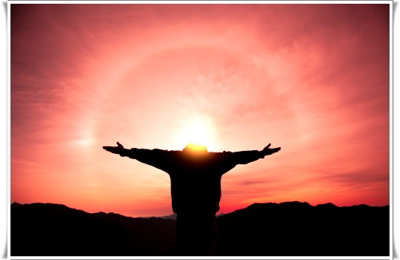
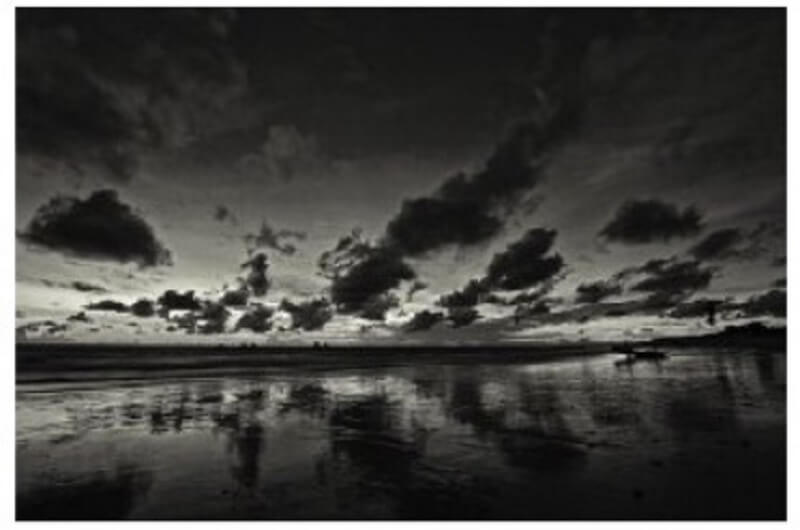
How to Photograph a Silhouette
A silhouette is a darker image of a subject against a brighter background. Here are top silhouette photography tips that you can implement right away.
Here are some useful Tips that will help you take great silhouettes:
- The best time to shoot silhouettes is in the beginning or end of the day, when the sun is low in the sky.
- Turn off the Flash as you need very little light in front of your subject.
- You need to turn off Active D-Lighting or Auto Lighting Optimizer. These features adjust the contrast in your picture in order to pull maximum detail from the shadows. Turn it Off
- Focus manually or focus on the edge of the subject (where the contrast between subject and background is greatest). You may need to use a smaller aperture for greater depth of field.
Camera Focus Settings & Modes
Understanding the various camera focus settings and modes can help you shoot in varied conditions and get sharp photos.
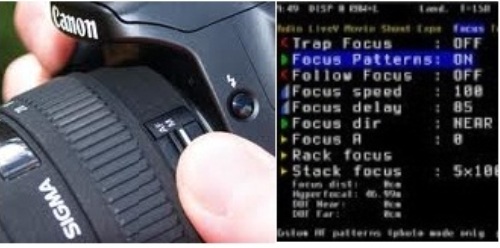
Focusing means moving the lens in and out until you get the sharpest possible image of the subject on the digital image sensor.
Here are some Focus Settings found on cameras that will help you to easily and reliably focus on a specific subject or scene.
- Fixed Focus: As the name suggests, it is fixed, you cannot change it. It is found on the least expensive cameras, almost all camera phones, and one-time-use cameras.
- Autofocus is available on most beginner point-and-shoot / compact cameras.
The camera does the focusing for you, and usually it is depicted by the square brackets or circles in the viewfinder.
Manual Focus: Want more control over the focus? You’ll need a camera with manual focus.
And that means using a single-lens reflex (SLR) camera. These cameras allow you to have complete control over the focus.
Here are some of the more common focus modes available in most cameras.
Depending on what you intend to shoot, you select one of these and click.
- Landscape Mode: For photographing landscapes
- Marco Focus Mode: For taking close-up images
- One-Shot Mode: You press the button halfway to lock the focus. If the subject moves, you’ll likely get an out-of-focus picture
- Continuous / Servo Mode: Similar to the One-Shot mode, however the camera will continue to focus on the moving subject. This is great for sports and nature photography.
- Predictive Focus Mode: Still not very common and found only in some high-end digital SLR cameras. It tracks and analyses the subject’s movement and tries to predict where it will move to. Great for sports and nature photography!
- Focus Bracketing: Found only in certain cameras. It takes one picture at the specified focus setting, and then clicks two more shots with focus set behind and in front of the calculated distance. You can then select the sharpest image.
Various Photography Styles
There are various styles of photography.
- Wedding
- Photojournalism
- Portrait
- Pets
- Stock
- Sports
Top Digital Photography Tips for Beginners
So how can you make the best of your digital camera?
Here are some obvious ones that you may be aware of:
Sunlight: You need to be careful of the bright and overhead sunlight; always try to shoot with the sun behind you.
When shooting at night, to avoid blurred pictures, ensure that you keep the camera steady and set the shutter speed slower to let enough light in.
Here are some more really useful tips that will help you to improve your photography skills right away.
- Positioning the Camera
The way you hold your digital camera to shoot your subject can make a huge difference between a good photo and an amazing one.
Practice holding the camera close to the body. Most amateur photographers tend to hold the camera while stretching their arms forward (away from the torso), and even bend their body forward. This reduces stability and can reduce the image sharpness.
Keep the camera close to your body in order to maintain maximum stability and get sharper pictures.
At times, you simply need to modify its angle for capturing some really creative shots. Try moving your camera in relation to the subject to see what works best; experiment a little with your composition by zooming in and zooming out.
- Know how your camera works.
Learn in detail how your CAMERA WORKS. Learn to adjust the exposure settings, change lens setting, use the camera’s built-in flash, turn off the auto-sharpening feature, navigating the Menu, etc.
Some photography techniques require you to use specific exposure mode or lens setting. So know your camera well.
- Get closer to the subject
Need a close up? Try to get closer to the subject, instead of using the ‘zoom’ features. By now, you may have realized that zooming reduces the image quality a bit (unless you’re using professional gear). So use your legs to zoom instead.
- Optical Zoom Versus Digital Zoom
Optical Zoom is a “real zoom,” meaning the image is brought closer to the capture mechanism using the lens optics.
Digital Zoom is a “fake zoom,” meaning the zoom is “interpolated” or guessed by electronics. Its not as clear as a real zoom.
So if possible, buy a camera with higher optical zoom.
- Use of Sun light
If you have spent some time with the camera, I’m sure you would have figured by now, that it is best to shoot with the sun behind you. Natural sun light offers the best lighting to help you shoot pictures with vivid colors and deeper details, so you need to learn how to exploit the sunlight to your advantage. You also need to be careful of the bright and overhead sunlight (considered harsh) as they can display harsh shadows and also wash out details from the face.
- About the Background
Background elements behind your subject could very well make or mar the results of your photos. For this reason, you should know how to evaluate the clutter and other disturbing elements behind your subject. Avoid capturing photos with a competing or busy background. Look for any objects that take the attention away from your subject, and remove them before taking photographs. - How to Use Flash
It is important to experiment with Flash as you can achieve some great results by using it properly. You need to learn how to maintain the proper distance from your subject. Usually, if you get too far from your subject, you might end up with dark pictures. On the contrary, if you get too close, you might get overexposed flash photos. - Shooting at Night
One can get some spectacular shots at night, even with the flash turned-off. For that you need to ensure that the shutter speed is slower, so that enough light can get in. It is also very important to stay steady else you will end up with blurred pictures. I am sure you would have already experienced this blurring effect. For best results, it is best to place your camera on a tripod and set its shot timer to avoid any camera movement. - Shooting in Cloudy Conditions
Though sunlight is important for good photos, you can also capture some breathtaking pictures in overcast conditions. You need to be careful enough to wrap your camera in some plastic bag, to prevent it from getting wet. Make a hole that is big enough for the lens to poke through, so that you can take photos. The key to taking good pictures in cloudy conditions is to make colors pop up, in contrast to the cloudy sky.
- Using Photo-Editing Software
Try to get it right with your camera in the first place. Even though Photoshop is a great tool, avoid saying “I’ll fix it in Photoshop.”
Having said the above, photo editing plays an important role in digital photography – you can do lots of things to your photo after it has been shot. Image editors allows you to fix bad color, crop pictures, or remove defects such as “red eyes” found in many flash photos, or even get rid of certain objects from the photo. Its definitely worth your time developing skills on image editing program in order to be an all-around photographer.
- Become a life-long student
Learn the rules, fundamentals, concepts and principals of photography thoroughly so you know when and how to break them effectively.
Professional photographers usually have the best camera, better lenses, several accessories, lights, and more.
However, more than the kit, its important to learn how to use them, and to know what you need, for your style of photography. And that comes through practice and experience.Practice makes perfect so shoot as much as you can, its also a lot cheaper nowadays (compared to films). Don’t just spray and pray – get it right in the camera.
Photography, like any other art form, is a journey. You should always be looking to improve, learn new things and try new things. You always remain a student of photography because technology changes so fast. So commit to lifelong learning and keep up with all the changes.
Here are more tips for budding photographers:
- Lighting plays an important role in photography so you need to check the lighting of the area. You also need to decide which angle to shoot from (for better lighting) and to get the best picture.
- You should also observe well. For example, if you find a spider, you should go close and checkout if you can see a spider web as well. A spider web can make a great picture (because of its pattern).So you eye is the best tool for finding the right subject for photography.
- Also, most people and animals do things that will never happen again. That’s why you must have ready access to your camera and also know what settings to use to quickly capture the photo.
- There is no such thing as the perfect photo. Every photographer will pick holes in their own work, especially the best of them. The perfect photo is only in your mind and is more likely to be the idea of the next shot you take. You must take lots of pictures; even the worst photographer can get lucky if they stack the odds!
- Taking photographs is a personal process. It’s an exploration of your own picture of you versus my picture of you. You’ve got to treat it as an extended discussion between photographer and subject. It kind of helps if you like people, too.
- Never think that the camera is the most important thing. The camera is a tool. It’s the environment, the atmosphere and the collaboration that will get you the shot. So find a camera that you are comfortable with and enjoying using and stick to that.
- You need to experiment and take risks. There is no right and wrong. So be brave and go for it. Experiment; take inspiration from other people by all means, but never copy.
- The lens is just a window you’re looking through. The more you can imagine that, the better. It will break down the barriers between you and your subject. Everyone, no matters how famous they are, gets nervous in front of the camera. Everyone. So learning to smile with your eyes and communicate with them as if the camera isn’t there is a great help.
Here are some more things that you should do, to improve your photography:
- Read the Instruction Manual Carefully: This will help you better understand your camera, and its features.
- Keep Practicing: Use your camera regularly to develop your photography skills. Click different kinds of pictures, try out all its features. Experiment with lighting, shutter speed and so on.
- Checkout Forums, blogs and Websites: This will help you gain insight into the creative world of photography.
- Keep practicing, keep clicking!
There are so many books and magazines on digital photography that will help you get to the next level. You have to keep practicing, try out newer things, both while taking pictures as well as in photo-editing. The more you experiment, the sooner you will get better at photography.
Black and White Photography Tips
Black and White photos look classy and once in a while it feels good to see pictures in black and white. It takes you back in time when things seemed to be so relaxed and you can spot that in the pictures too.
Here are some tips for black and white photography.
1. Shoot in RAW
Also make sure that you shoot in RAW than any other format, if you want to have more control when editing on the computer. It also captures your color data in case you need it later.
Why not JPEG? You can shoot in JPEG, no problem with that, but jpeg compresses and discards some data so you will not have lot of control in post production.
2. Study Black And White Pictures
Check out some good pictures in black and white to see the details, to study the composition and get an idea of how lighting is used.
3. Use Rich Textures
To make your pictures livelier, use patterns, textures and detailed scenes when shooting the pictures.
4. Use of Contrast
Overcast conditions are suitable for shoot black white outdoor shots (a bit subjective as some may prefer the glow that is available on brighter days)
But since you don’t have color, experimenting with side lighting can provide you with shadows to help you get contrast. This will help to bring the tonal differences in your photos.
5. Use a Polarizer
If you have to shoot on brighter days a polarizer will help to cut the reflections of the sun’s light, which can be distracting in the overall composition especially when black and white photography is concerned.
6. Use Long Exposures
Long Exposures gives superb black and white photos. Try it out.
7. Shoot in Low ISO
You also need to shoot with the lowest possible ISO to ensure that the noise (grain) created by ISO does not become very obvious.
Low ISO Could Be Impractical: Though shooting in low ISO is preferred it may not be practical, especially for events like weddings. Experienced photographers feel that a High ISO makes the image feel more like film.
8. Check Your Results in LCD
Shoot several variations – color as well as black and white and check the results in your LCD.
9. Get a Good Photo Editing Software
If you have a good editing software program like Photoshop, you can easily make black and white photos using software programs. In addition you can edit several features to make your photos look better.
10. Learn to Use Software
You can also fix problems caused by bad lighting and do several other enhancements using software such as PhotoShop or Lightroom. To make your images look the best, you can even use techniques such as image manipulation to get sharp images.
Smartphone Photography Guide
Here are useful tips for taking amazing photos using your Smartphone (iPhone & Mobile Phones):
- Most smartphone cameras have resolution setting in low, medium, high (picture quality), make sure you set it to the best quality so that no detail is missing, and the image is not blurred when you take photo with it. You may not notice the differences on the smartphone’s display, but you will definitely see clear difference on computer or bigger screen.
- To get good quality images using your smartphone’s camera, stabilize it (no jittery hands). If possible, use a tripod. In low light situations, smartphone’s camera’s shutter speed tends to slow down to enable more light to travel in, and this means you’ll need to wait a bit longer to capture those special moment. A tripod should solve the problem. However, if its not available, use both your hands to hold the smartphone and rest your upper arms against your own body to stabilize the camera.
Remember, after hitting the capture button, don’t immediately move your smartphone. Stay still for a few more seconds to get good quality picture. - Nowadays, cameras on smartphones come with the zoom function, but its digital zoom which causes blurring when zoomed in to the maximum. So instead of relying on the zoom, make sure your subject matter fills up your smartphone’s display so you can obtain full details of it. If you get too close, your smartphone will become less focus and pictures will turn out distorted or blurry unless you have macro option.
- Make sure the photographed people do not bend their heads or wear a hat. Keep your iPhone’s viewfinder (iPhone’s screen) at eye level with the subjects. For example, squat down to photograph a small child, or stand on a stool to shoot taller people.
- Try to shoot early morning and just before sunset. The natural lighting is at its best and the effect is always splendid and somewhat dreamy due to the colourful sky. Harsh sunlight makes the subjects eyes squinted, and also distributes the light on photos unevenly and burns the images. If you have to shoot in bright sunlight, chose areas where there’s shadow. You may even take pictures indoors. You may turn off all the lights in your house and use the light coming from the window. Most experienced photographers suggest that the angle of 45 degrees (light falling on the subject) is the best shooting angle.
- Checkout out photo apps, you can find them on play store or Apple app store. There are many cool mobile photo filter apps (Photo Studio, PicsArt and Photo Editor) which can enhance your photos, either while taking the photo or after.
More Tips For Smartphone Street Photography
Street photography is not just holding a cell phone or a camera aimlessly looking for targets in the streets, you should occasionally stop and observe, maybe it will make you shoot next satisfaction masterpiece. Here are some more tips.
- Let your Phone on Standby: When on the street, opportunity will not wait for you, you have to be ready all the time. So keep your iPhone in photography mode, it allows you to unlock the phone screen and shoot immediately when on the streets.
- Stabilize Your Cell Phone: To avoid your photo to look fuzzy, stabilize your phone when shooting, especially in low-light conditions.
- Make Good Use of Your Headphones: iPhone original headset voice button can also use as a shutter, sometimes do not want to disturb the objects you want to shoot in street photography, you can pretend you’re listening to music or talking on the phone. It also allows you to reduce the vibration when you press the shutter button and accidentally touch the phone screen.
- Lock Aperture: Some ‘Apps’ functionality includes the locking of aperture and focal length. I personally like aperture lock function as natural light on the street is very random. Locking the aperture allows you to better control the light, it can not only make proper exposure to the photo, but also allows you to take different atmospheres in the same condition of light.
- Keep on Shooting: Those scenes on the street will not appear the second time, so keep shooting. If you don’t like the photo, you can delete it, but you absolutely cannot let a street scene happen again. Therefore, if your instincts want you to shoot, then you shoot, just do not hesitate.
- Be Alert & Anticipate: You never know what will happen in the streets. The ability to predict is no super powers, but use your powers of observation to determine interesting scenario “might” occur.
- Charge the Battery Before Going Out: Make sure your smartphone’s battery is charged. Preferably, take an external battery during street photography. Please remember to go out shooting after the battery is fully charged, or take along a backup battery
Photo Editing: Software and techniques to improve your images
Cameras nowadays take good quality pictures yet sometimes you wish you could enhance the image that you have captured.
Experienced photographers also take the help of photo editing software to touch up & color correct their images. Those awesome images that they put up on their portfolio and websites is not taken straight from the camera; it goes through a photo editing software.
Besides, with the advent of smart phones with better cameras and built-in photo editing apps, editing pictures have become easier than ever before.
The good thing is that their many digital photo editing software that gives you the ability to modify and edit the photos to get the perfect image you want.
A photo editing software comes with complete set of tools that can be used for enhancing pictures.
While Adobe Photoshop is the industry standard when it comes to photo editing, there are other digital photography software such as GIMP, Picasa, Kodak EasyShare Freeware that you can use to edit photos.
Adobe Photoshop is a software standard for many professional photographers & graphic artists. It comes with powerful tools that can do basic to advanced image manipulation efficiently, with outstanding results.
Most Photographers use Photoshop to touch-up their photos, before it goes out for printing or publishing. It is widely used for web designs, advertisements, posters, photography, desktop publishing, and many other graphic works. It’s one of the most popular products of Adobe Systems, which itself is a leader in developing graphic applications.
However, Photoshop is not free (GIMP is a good, free alternative).
How to Create a WEBP image File

WEBP is a modern image format developed by Google to address the limitations of older image formats like JPEG and PNG. The primary goal is to provide a format that offers high-quality images while keeping file sizes impressively small.
WEBP’s development was driven by the need for faster web page loading times and improved user experiences. As internet speeds and mobile device usage surged, it became evident that traditional image formats were becoming bottlenecks in delivering content efficiently.
Google’s WEBP Converter, Online Image Editors and editing software such as GIMP are few tools that you can use to create WEBP files.
The compression quality setting determines how much data is retained in the final WEBP file. Higher quality settings preserve more image details but result in larger file sizes, while lower quality settings reduce file size at the expense of some image details.
So, experiment with different compression settings.
How to Create GIF Files

GIFs are now an integral part of modern online communication. These visual snippets, often conveying emotions, reactions, and humor, have found their way into social media, messaging platforms, and even professional content creation.
GIFs, short for Graphics Interchange Format, are basically image files capable of capturing moments in time and presenting them as animations that play on a continuous loop.
Remember, the quality of your source material (video or image) directly impacts the final GIF.
Creating GIFs doesn’t require specialized software or technical expertise. You can choose from a range of free tools available online to create GIFs from videos and image sequences.
When creating the GIFs, you can adjust the GIF’s parameters to suit your preferences:
- Frame Rate: This determines how many frames are shown per second. A standard frame rate is around 24-30 frames per second.
- Duration: Decide how long your GIF should play. Keep in mind that shorter GIFs are often more impactful.
- Size: Specify the dimensions of your GIF. Common sizes for social media are 480×270 or 640×360 pixels.
- Looping: Set whether the GIF should loop continuously.
Embracing experimentation and refining your style is the key to creating GIFs that inspire and entertain audiences.
How to remove the background of a photo
Removing the background from a photo involves isolating the main subject (usually a person, pet, monument) and removing the other unwanted elements or surroundings.

There are several reasons why you may want to remove the background of a photo.
- E-commerce entrepreneur need pictures of products they sell online
- College Student need images for their projects
- Graphic Designers need to work with images to create logos and illustrations
- Social Media marketers use images to create visually engaging posts and collages.
- There are many who spend considerable time editing images
- Even in your own collection of personal photos, you will find many photos in which removing the background can greatly enhance its visual appeal.
In each of these cases, removing backgrounds of the images opens up a world of creative possibilities.
The good thing is that the process of removing backgrounds from photos can be easily done using editing software or online tools.
How to remove Red-Eye from photos
Good photos can get marred by an annoying phenomenon known as red-eye. Red Eye is a glowing red (or sometimes yellow eyes) that you see in the captured image, which can be distracting, and in some cases, make the subject look demonic and diminish the overall quality of the photo.
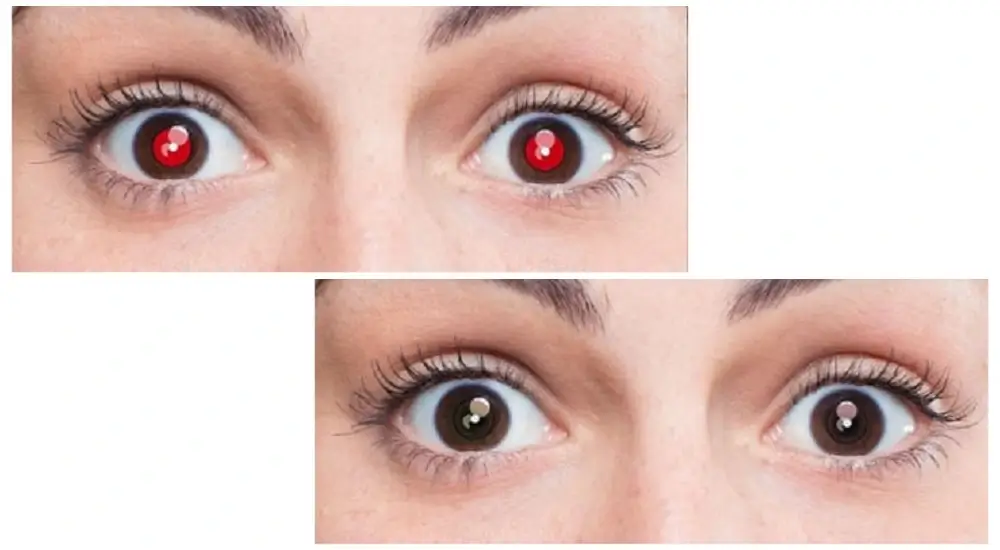
It occurs when the flash of a camera illuminates the subject’s eyes and causes a reflection of light off the retina to bounce back into the lens.
It’s a common occurrence in flash photography, especially when shooting in low-light environments or when the subject is very close proximity to the camera. Compact cameras, where the flash is located near the lens, are particularly susceptible to red-eye.
Factors such as the color of the subject’s eyes, the direction of the flash, and the intensity of the flash can also influence the severity of red-eye. For example, people with lighter-colored eyes tend to be more prone to red-eye, while those with darker-colored eyes may exhibit less noticeable or even no red-eye at all.
You can use software to remove red-eye from photos. Just choose the red-eye removal feature and click on the red-eye areas in your photo, the software will automatically make the necessary adjustments to remove the red-eye effect. You can also use online websites for to red-eye removal.
Here are some techniques to minimize the occurrence of red-eye:
- Try using indirect or bounced flash techniques such as bouncing the flash off a ceiling or wall, which helps diffuse the light and reduces the intensity of direct reflection from the eyes.
- By increasing the ambient lighting in the environment, you can minimize the need for a powerful flash and decrease the chances of red-eye occurring.
- Many cameras have a built-in red-eye reduction mode that can help prevent or minimize red-eye.
- Changing the angle from which you capture your photos can help minimize the red-eye effect.
- Whenever possible, take advantage of natural lighting for your photography.